Containerizing Development with VS Code Devcontainers
Last modified: 4/26/2023Prefer video format? See the youtube video instead
In this blog post, I’ll be going over the VS Code Remote Containers extension and devcontainers. I’ll start by introducing what dev containers are, then dive into how to create and configure one in VS Code. Lastly, I’ll reflect on why using dev containers could be beneficial for your development environment.
What are Dev Containers?
One of the most frustrating experiences can be environment setup, whether you’re getting started in a new project, coming back to an old project, or switching back and forth between multiple projects. We’ve all heard the dreaded phrase, “Works on my machine.” This is where VS Code Dev Containers comes in. It allows you to provide an environment configuration to automatically run your development environment in a container with everything pre-configured. You don’t even need the dependencies on your host machine!
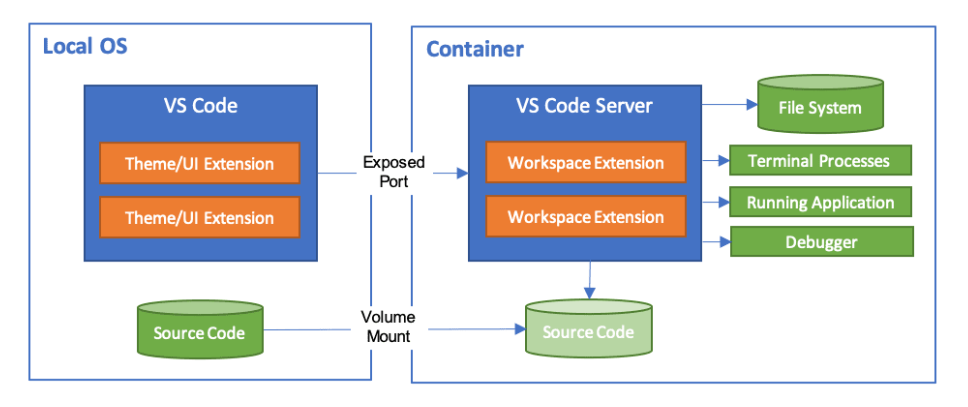
In short, a dev container is a containerized environment used for development purposes. It mounts your repository inside a Dockerfile so that you can develop in an isolated environment.
Creating a Dev Container
To create a dev container, you’ll need to have VS Code and Docker installed, as well as the VS Code Remote Container extension installed. Next, pick a project and open it in VS Code (it can be an empty folder).
Note: See here for more information on system requirements
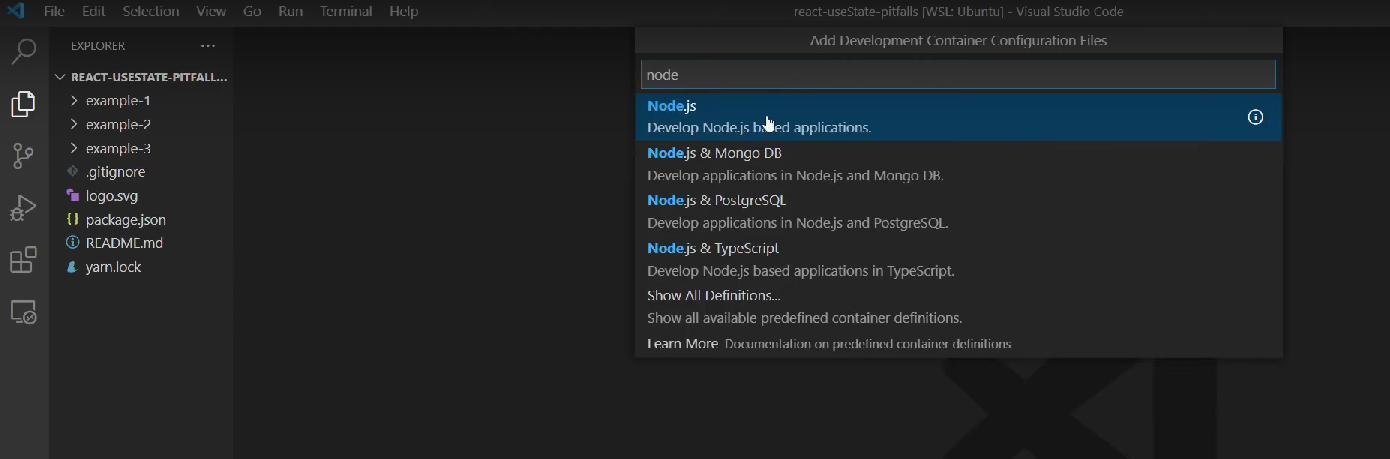
Once you’ve opened the project in VS Code, open the command palette (Ctrl/Cmd+Shift+P) and type “Create New Devcontainer Config.” Cycle through the options and select the image most appropriate for your project. Most of my projects are javascript-based, so I normally choose Node.
After going through all the prompts, you should see a pop-up that says “Re-open in container.” Let’s hold off on doing that for now though & take a look at the .devcontainer/devcontainer.json file that was generated.
devcontainer.json
You should notice that there’s a new devcontainer.json file added to your project that looks something like the following:
// For format details, see https://aka.ms/devcontainer.json. For config options, see the
// README at: https://github.com/devcontainers/templates/tree/main/src/javascript-node
{
  "name": "Node.js",
  // Or use a Dockerfile or Docker Compose file. More info: https://containers.dev/guide/dockerfile
  "image": "mcr.microsoft.com/devcontainers/javascript-node:0-18"
  // Features to add to the dev container. More info: https://containers.dev/features.
  // "features": {},

  // Use 'forwardPorts' to make a list of ports inside the container available locally.
  // "forwardPorts": [],

  // Use 'postCreateCommand' to run commands after the container is created.
  // "postCreateCommand": "yarn install",

  // Configure tool-specific properties.
  // "customizations": {},

  // Uncomment to connect as root instead. More info: https://aka.ms/dev-containers-non-root.
  // "remoteUser": "root"
}
The full specification for the file is available for reference here, but I’ll list some of the more useful options here:
Install global tools with a custom Dockerfile
Sometimes, global tools are useful for development, but you don’t necessarily want to add them to your app’s package.json or other dependency management file.
If you want to automatically install additional global tools on creation, you can create a Dockerfile in the .devcontainer/ folder with the following:
# Dockerfile
# Note: The following line should come the "image" field in your devcontainer.json
FROM mcr.microsoft.com/devcontainers/javascript-node:0-18

# Automatically install lighthouse globally for the container
RUN su node -c "npm install -g lighthouse"
Next, replace the “image” field in your devcontainer.json file with a “build option”:
// .devcontainer/devcontainer.json
{
  "name": "Node.js",
  "build": {
    "dockerfile": "Dockerfile"
  }
}
Provide default vs code configuration
If you want to provide default vscode options (for example, theme or default extensions), you can add a “customizations.vscode” option:
// .devcontainer/devcontainer.json
{
  "name": "Node.js",
  "customizations": {
    "vscode": {
      "extensions": ["astro-build.astro-vscode"],
      "settings": { "workbench.colorTheme": "Monokai" }
    }
  }
}
Forward Used Ports
If you need to access your app from localhost, you can configure the devcontainer to forward any necessary ports so that any services run as expected. To do that uncomment the “forwardPorts” and list any that you need:
// .devcontainer/devcontainer.json
{
  "name": "Node.js",
  "forwardPorts": [3000]
}
Building the Devcontainer
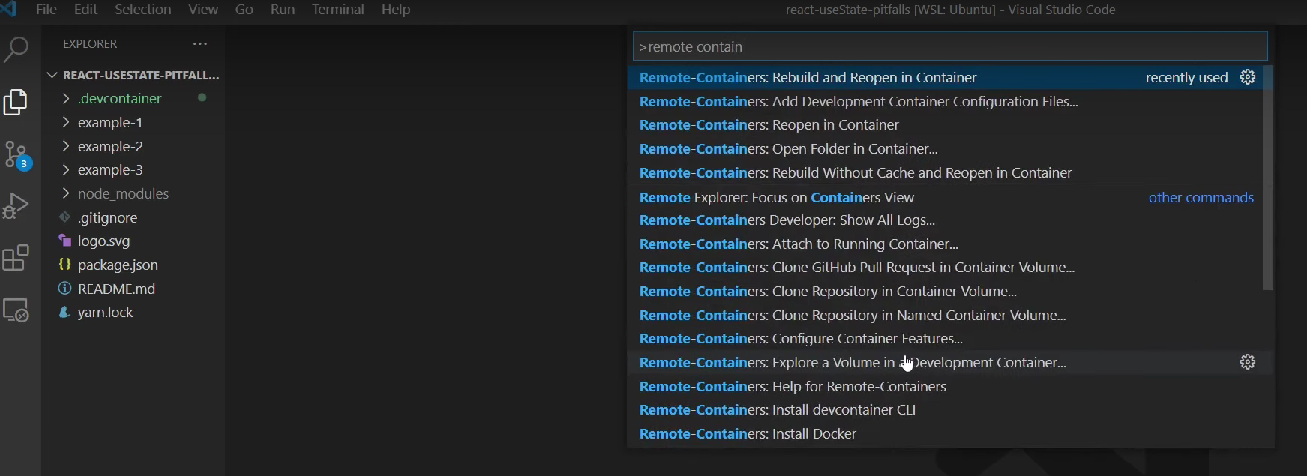
Now that the configuration is setup, let’s build the container and see what it looks like inside. Open the command palette and run “Remote Containers: Rebuild & Reopen in Container”. Note that this may take a bit the first build, but since the image is built with Docker, subsequent rebuilds of the container should be cached and lightning quick.
Once that’s finished, you should see a VS Code window opened. If you applied any configuration, (for example, default theme, or extensions), you should see that they are installed & applied to your IDE. Additionally, if you open a terminal, you should also see that any globally installed tools are available. From here, you have a fully functional IDE running from within a container!
Conclusion
I’ve been using dev containers for about a year now and my experience has been extremely positive. Once setup, onboarding for your projects becomes extremely simple - install VS Code and docker. That’s it. No more “Works on my machine” problems or making sure that you have the right packages installed. If we take a look at my terminal window, you can see that I’ve never installed node or npm on my machine. It’s all installed within a docker image - this is awesome, because it means I can keep my local development environment in a really clean state. If you want to simplify your setup or find yourself constantly modifying your local environment when switching between projects, I strongly recommend you take a look at vs code dev containers. It has certainly made my development workflows easier.